AWS CloudFormation
AWS CloudFormation 에 대해 공부하고 정리한 내용입니다.
- CloudFormation 이 무엇인가
- Intrinsic functions
- Multiple resources
- Pseudo parameters
- Mappings
- Input Parameters
- Outputs
- Setting up EC2 instance with template
- Change Sets
용어 정리
Templates:
- yaml or json 으로 되어있는 텍스트 파일.
- CluodFormation 의 input 으로 사용됨.
- Infrastructure 의 endstate 가 정리되어 있음.
Stack:
- CloudFormation 이 template 를 실행하면 만들어지는 것.
- template 에 있는 자원을 갱신하려면 해당 stack 을 갱신해야 함.
- 관련된 자원들의 집합을 하나의 단위로써 “stack” 이라고 부른다.
- EC2, Elastic Load Balancing, VPC, S3, …
Change set:
- stack 을 갱신할 때 changet set 을 만들 수 있다.
- change set 은 해당 change 가 현재 실행되고 있는 자원에 어떤 영향을 주는지 볼 수 있게 해준다.
- live system 에서 매우 중요함.
기존에 cloud server 를 사용할 때의 문제점:
- configuring / managing servers
이를 Custom script 로 관리하고자 했을 때의 문제점:
- Error prone
- Point solution
- Difficult to change and maintain
- Rarely made truly reusable
CloudFormation 이 무엇인가
Infrastructure as Code tool for AWS
Cloud formation 은 AWS 의 무료 서비스이므로, 추가 요금이 발생하지 않는다.
Cloud formation 의 기능
- Create: template 에 기반해 AWS infrastructure 를 생성
- Update: AWS infrastructure 에 필요한 기능을 업데이트
- Delete: 생성한 AWS infrastructure 를 쉽게 제거
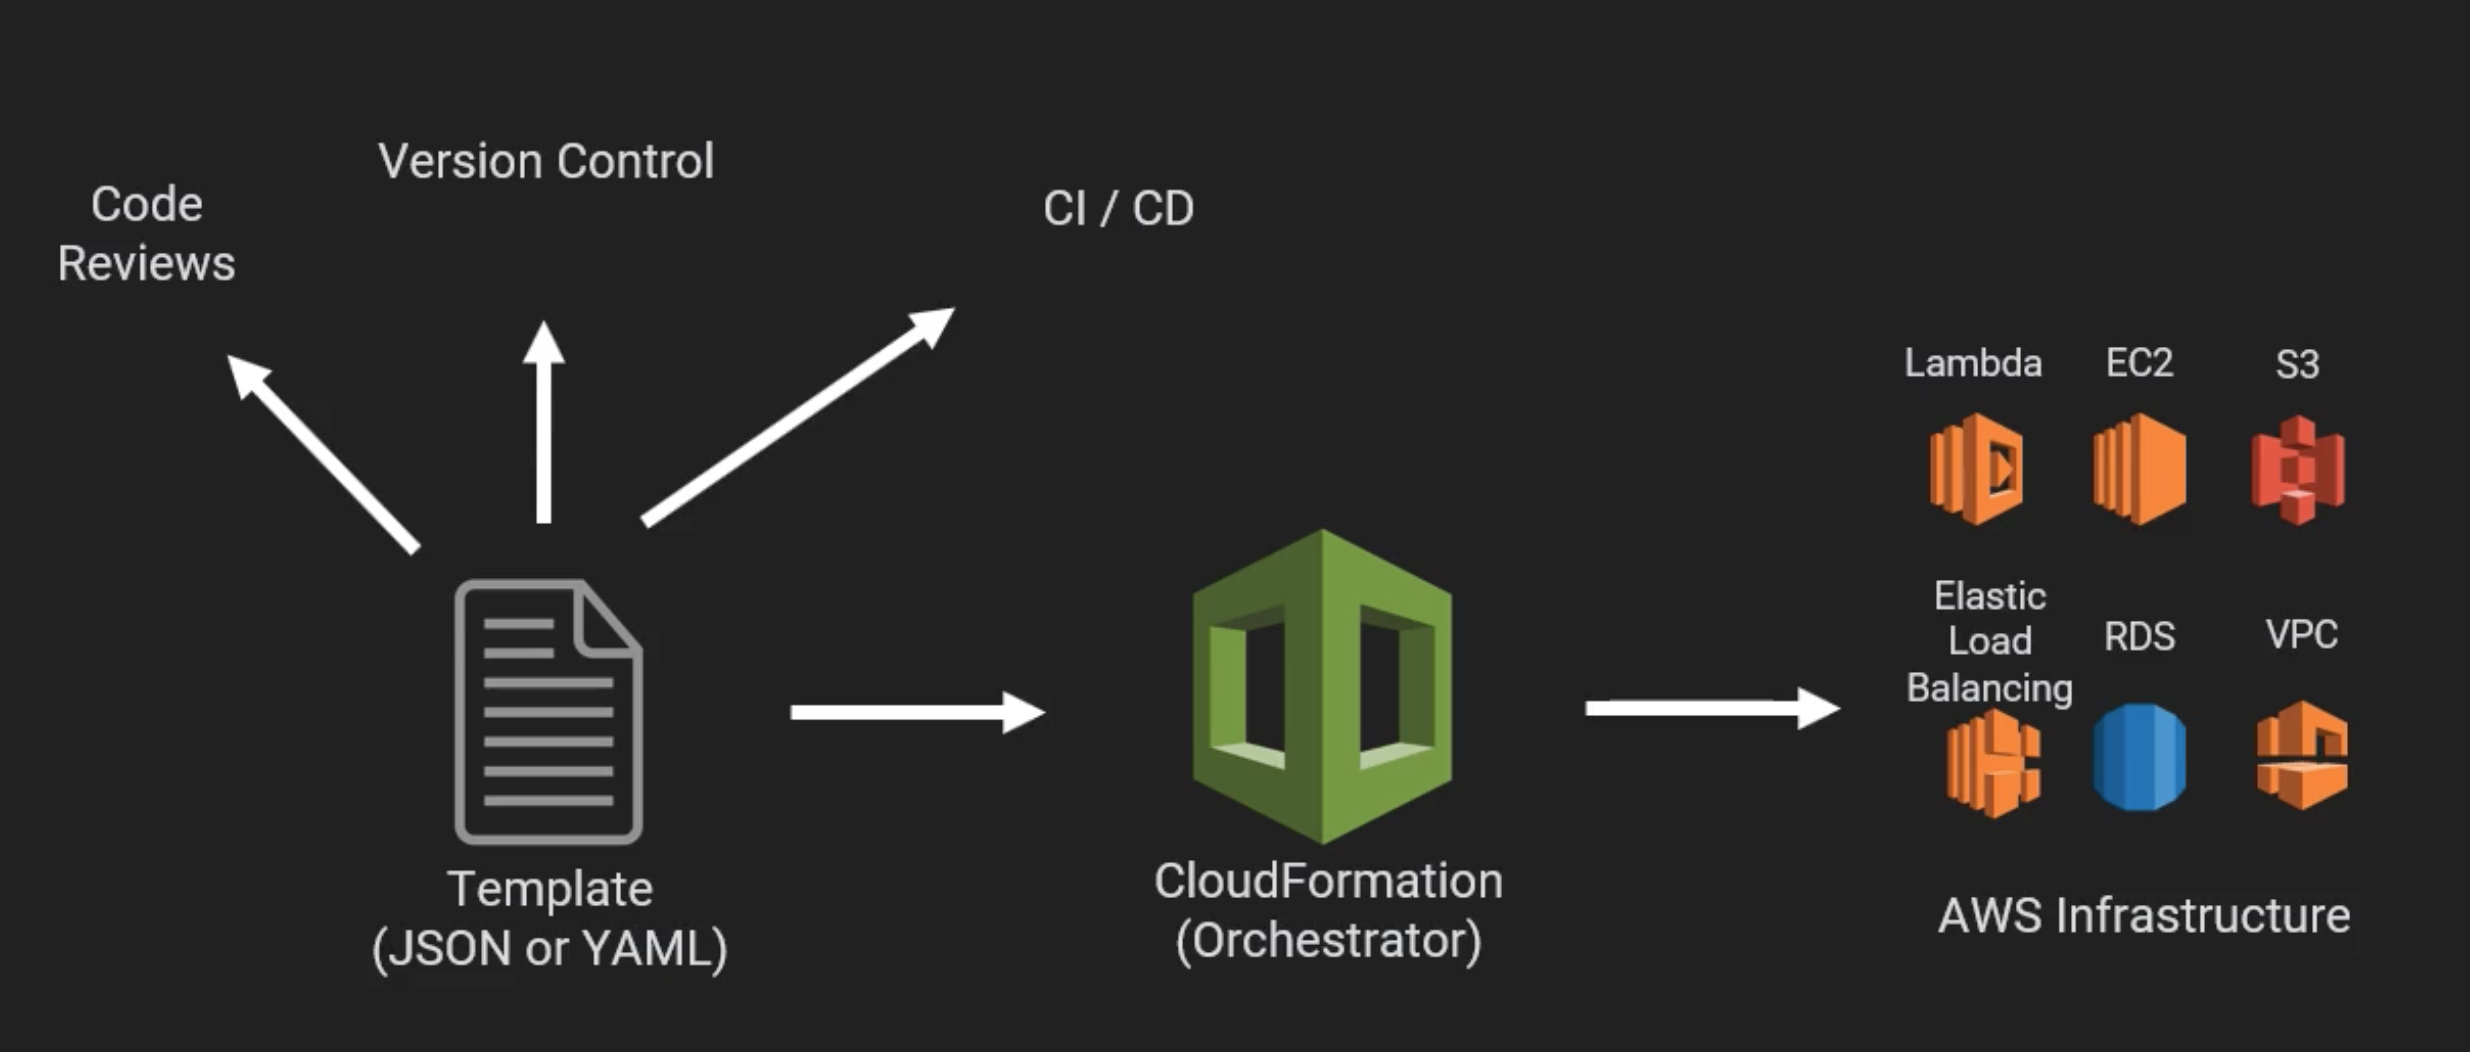
CloudFormation 을 사용하면 다음 작업들이 가능하다:
- template 를 이용해 AWS infrastructure 를 구상 & 설치
- provision & configuration 자동화
- dependency 관리
- infrastructure 의 변화를 쉽게 조절 & 트래킹
- 깔끔한 Rollback or Delete
사용 예시
 |
|---|
| 위와 같은 template 파일을 작성 |
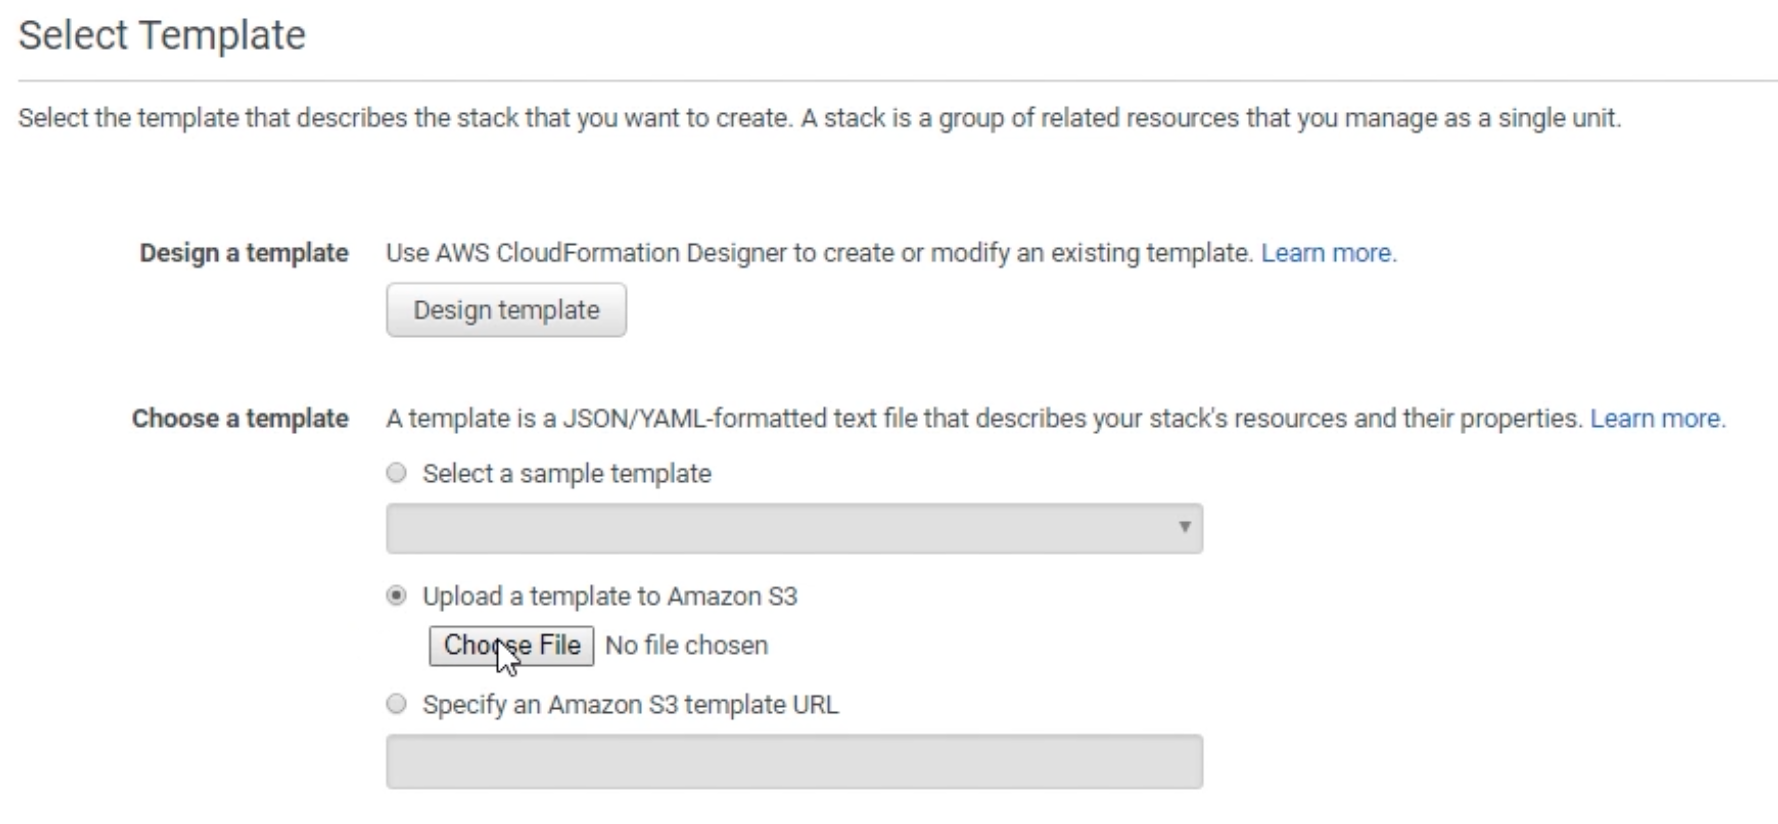 |
| AWS CloudFormation 에서 create 할 때 이 template 을 업로드 |
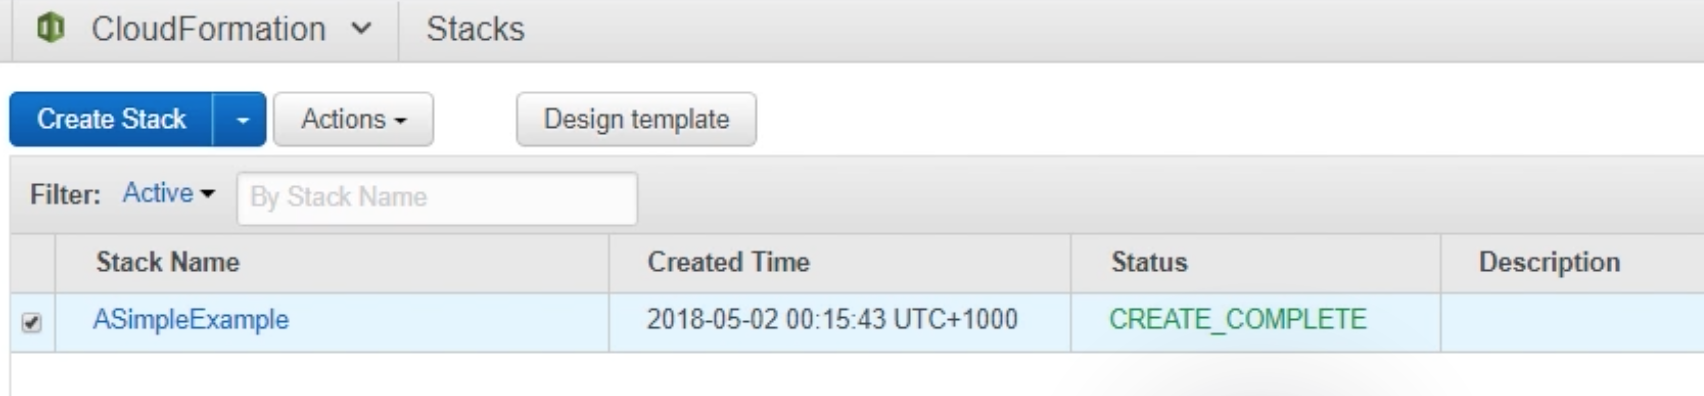 |
| 해당 stack 이 생성됨 |
 |
| Update 와 Delete 도 마찬가지의 과정으로 진행 |
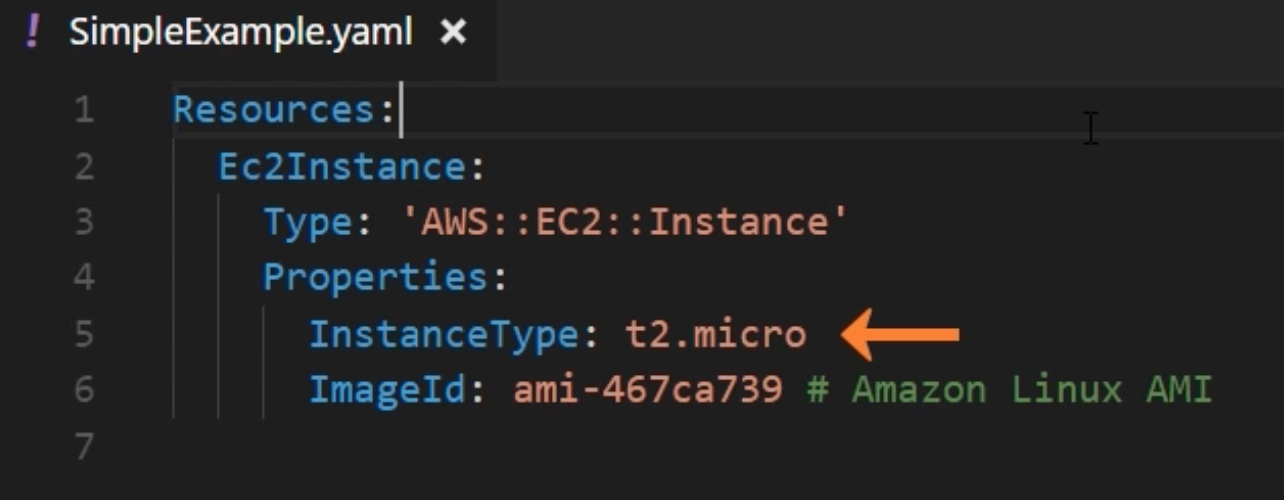
Template 예시
// json
{
    "AWSTemplateFormationVersion": "version date", // 2010-09-09 (optional)
    "Description": "JSON string", // optional
    "Metadata": { template metadata }, // optional
    "Parameters": { set of parameters }, // optional
    "Mapping": { set of mappings }, // optional
    "Conditions": { set of condition }, // optional
    "Transform": { set of transforms }, // optional
    "Resources": { // Required
        "MyEC2Instance": { // logical ID
            "Type": "AWS::EC2::Instance",
            "Properties": {
                "ImageId": "ami-12345678",
                "InstanceType": "t2.micro",
            }
        }
    },
    "Outputs": { set of outputs } // optional
}
Template 의 Resources 다른 예시
# yaml
Resources:
    MyS3Bucket:
        Type: AWS::S3::Bucket
        Properties:
            BucketName: HelloWorldWebsite
            AccessControl: PublicRead
            WebsiteConfiguration:
                IndexDocument: index.html
Intrinsic functions
stack 을 관리할 때 사용할 수 있는 built-in functions 정리
1. Join
// json
{"Fn::Join": ["delemeter", [comma-delimited list of values]]}
// example
{"Fn::Join": [":", ["a", "b", "c"]]} // == "a:b:c"
# yaml
!Join[delemeter,[comma-delimited list of values]]
# example
!Join [":", [ a, b, c]] # == "a:b:c"
2. Ref
// json
{"Ref": "AWS::Region"}
# yaml
!Ref AWS::Region
3. FindInMap : Mappings 로 정의한 변수에 접근
// json
{"Fn::FindInMap": ["MapName", "TopLevelKey", "SecondLevelKey"]}
{"Fn::FindInMap": ["RegionMap", "us-east-1", "AMI"]} // RegionMap 의 us-east-1 에 대한 AMI 값을 반환
# yaml
!FindInMap [MapName, TopLevelKey, SecondLevelKey]
!FindInMap [RegionMap, us-east-1, AMI] # RegionMap 의 us-east-1 에 대한 AMI 값을 반환
4. GetAtt
// json
{"Fn::GetAtt": ["EC2Instance", "PublicDnsName"]}
# yaml
!GetAtt
    - EC2Instance
    - PublicDnsName
아래에는 CloudFormation 의 요소들을 정리함.
- Multiple resources
- Pseudo parameters
- Mappings
- Input Parameters
- Outputs
Multiple resources
CloudFormation 은 여러 자원을 다룰 때 유용함.
예시: EC2 with a security group to open port 22 (ssh)
기존에는 먼저 security group 을 port 22 로 열고, EC2 instance 가 이를 참조하게 해야함.
CloudFormation 은 이러한 dependency 를 알아서 순서대로 처리해준다.
아래와 같이 template 를 작성하면 된다.
Resources:
  Ec2Instance:
    Type: 'AWS::EC2::Instance'
    Properties:
      InstanceType: t2.micro
      ImageId: ami-43874721 # Amazon Linux AMI in Sydney
      Tags:
        - Key: "Name"
          Value: !Join [ " ", [ EC2, Instance, with, Fn, Join ] ]
      SecurityGroups:
        - !Ref MySecurityGroup # 아래의 SecurityGroup 을 참조하도록 설정
  MySecurityGroup:
    Type: 'AWS::EC2::SecurityGroup'
    Properties:
      GroupDescription: Enable SSH access via port 22
      SecurityGroupIngress:
        - IpProtocol: tcp
          FromPort: '22'
          ToPort: '22'
          CidrIp: 0.0.0.0/0
Pseudo parameters
Pseudo parameters 는 CloudFormation 에서 이미 지정해둔 매개변수들이다.
따라서 Template 에서 따로 선언할 필요 없다. (환경변수와 비슷하다)
Ref 라는 function 을 통해 참조할 수 있다.
pseudo parameters 예시:
// json 에서는 "Ref": ~~ 라고 지정한다.
{
    "Resources": {
        "MySecurityGroup": {
            "Type": "AWS::EC2::SecurityGroup",
            "Properties": {
                "GroupDescription": {
                    "Ref": "AWS::Region"
                }
            }
        }
    }
}
# yaml 에서는 !Ref ~~ 라고 지정한다.
Resources:
  Ec2Instance:
    Type: "AWS::EC2::Instance"
    Properties:
      InstanceType: t2.micro
      ImageId: ami-43874721 # Amazon Linux AMI in Sydney
      SecurityGroups:
        - !Ref MySecurityGroup
      Tags:
        - Key: "Name"
          Value: !Join # 두 개의 문자열을 연결한다.
            - ""
            - - "EC2 Instance for "
              - !Ref AWS::Region # Ref 함수를 사용해 pseudo parameter 를 사용한 부분
  MySecurityGroup:
    Type: "AWS::EC2::SecurityGroup"
    Properties:
      GroupDescription: Enable SSH access via port 22
      SecurityGroupIngress:
        - IpProtocol: tcp
          FromPort: "22"
          ToPort: "22"
          CidrIp: 0.0.0.0/0
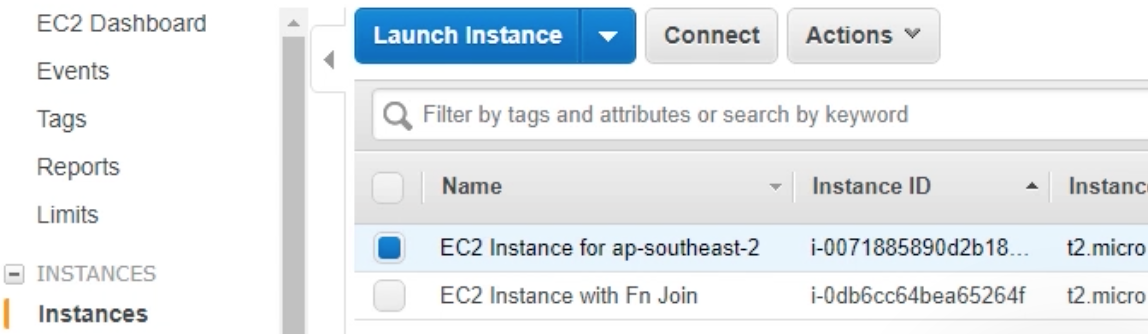 |
|---|
| 위의 yaml 파일을 사용해 EC2 instance 의 Name 을 EC2 instance for ap-southeast-2 로 바꾼 결과 |
자주 사용되는 pseudo parameters:
AWS::AccountId : AWS 계정의 account ID 를 반환한다.
AWS::NotificationARNs : 현재 stack 의 notification ARNs 목록을 반환한다.
AWS::StackId : stack ID 를 반환한다.
AWS::StackName : stack name 을 반환한다.
AWS::Region : 자원이 생성된 AWS Region 을 나타내는 문자열을 반환한다.
그 외의 paramter 에 대한 설명은 다음 링크를 참조해보자: 링크
Mappings
Mapping 은 stack 을 구성할 때 자동으로 설정되는 항목을 정할 수 있게 해준다.
예를 들어 AMI ID 를 region 에 따라 결정하고자 할 때 Mapping 을 사용할 수 있다.
아래와 같이 Mappings 와 FindInMap 함수를 사용하면 Region 에 따라 올바른 AMI ID 를 사용해 instance 를 만들 수 있게 된다.
// json
"Mappings": {
    "RegionMap": {
        "us-east-1": {"AMI": "ami-78293f291"},
        "us-west-1": {"AMI": "ami-6552930fa"}
    }
    // 위와 같이 설정된 key-value 가 있을 때
}
...
"ImageId": {
    "Fn::FindInMap": ["RegionMap", {"Ref": "AWS::Region"}, "AMI"]
    // RegionMap 의 "us-east-1" 에서 AMI 값을 반환한다.
}
# yaml
Mappings:
    RegionMap:
        us-east-1:
            AMI: ami-78293f291
        us-west-1:
            AMI: ami-6552930fa
...
Resources:
    Ec2Instance:
        Type: 'AWS::EC2::Instance'
        Properties:
            ImageId: !FindInMap
                - RegionMap
                - !Ref 'AWS::Region'
                - AMI
Input Parameters
Input Parameters 는 template 에 custome value 를 입력할 수 있게 해준다. (Argument 의 역할)
이들은 top level Parameters 부분에서 정의된다.
각 parameter 는 하나의 값이 할당되어 있어야 한다.
default value 를 설정할 수도 있다.
필요한 유일한 attribute 는 데이터 타입을 나타내는 “Type” 이다.
지원되는 Type 의 목록:
- String
- Number
- List<Number>
- CommaDelimitedList
- AWS-specific types (AWS::EC2::Image::Id 등)
- Systems MAnager Parameter types
Input parameters 를 사용한 예시:
// json
"Parameters": {
    "InstTypeParam": {
        "Type": "String",
        "Default": "t2.micro",
        "AllowedValues": [
            "T2.micro",
            "m1.small",
            "m1.large"
        ],
        "Description": "EC2 Instance Type"
    }
}
...
"Resources": {
    "Ec2Instance": {
        "Type": "AWS::EC2::Instance",
        "Properties": {
            "InstanceType": {
                "Ref": "InstTypeParam"
            },
            "ImageId": "ami-2f726546"
        }
    }
}
# yaml
Parameters: # 사용하고자 하는 paramters 를 정의함.
  NameOfService:
    Description: "The name of the service this stack is to be used for."
    Type: String
  KeyName:
    Description: Name of an existing EC2 KeyPair to enable SSH access into the server
    Type: AWS::EC2::KeyPair::KeyName
Resources:
  Ec2Instance:
    Type: 'AWS::EC2::Instance'
    Properties:
      InstanceType: t2.micro
      ImageId:
        Fn::FindInMap:
        - RegionMap
        - !Ref AWS::Region
        - AMI
      SecurityGroups:
        - !Ref MySecurityGroup
      Tags:
        - Key: "Name"
          Value: !Ref NameOfService # Parameters 에서 정의한 input parameters 를 사용함.
아래는 위 yaml 파일에서 지정한 “KeyNAme” 의 AWS::EC2::KeyPair::KeyName 가 사용된 예시이다.
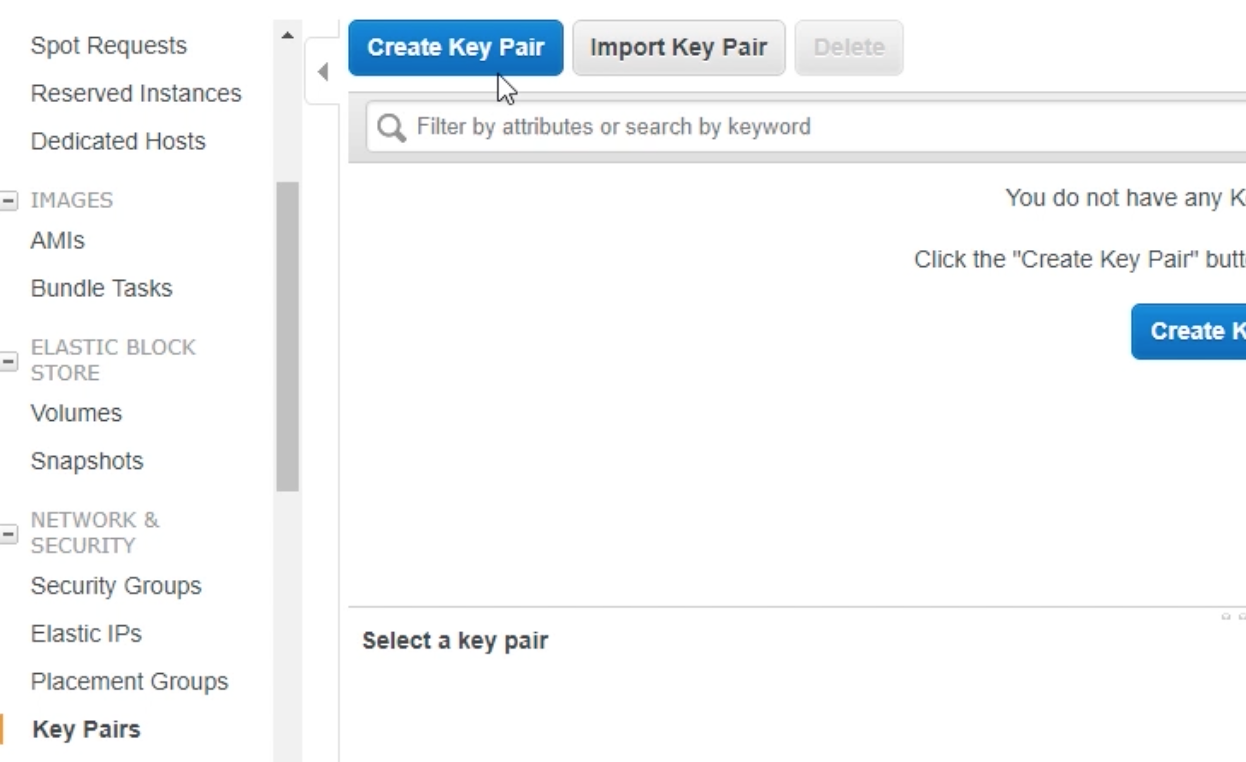 |
|---|
| 먼저 EC2 에서 key-pair 가 만들어져 있어야 함. EC2 -> Key pair 에서 Create 로 “Test key pair” 를 만든 뒤, |
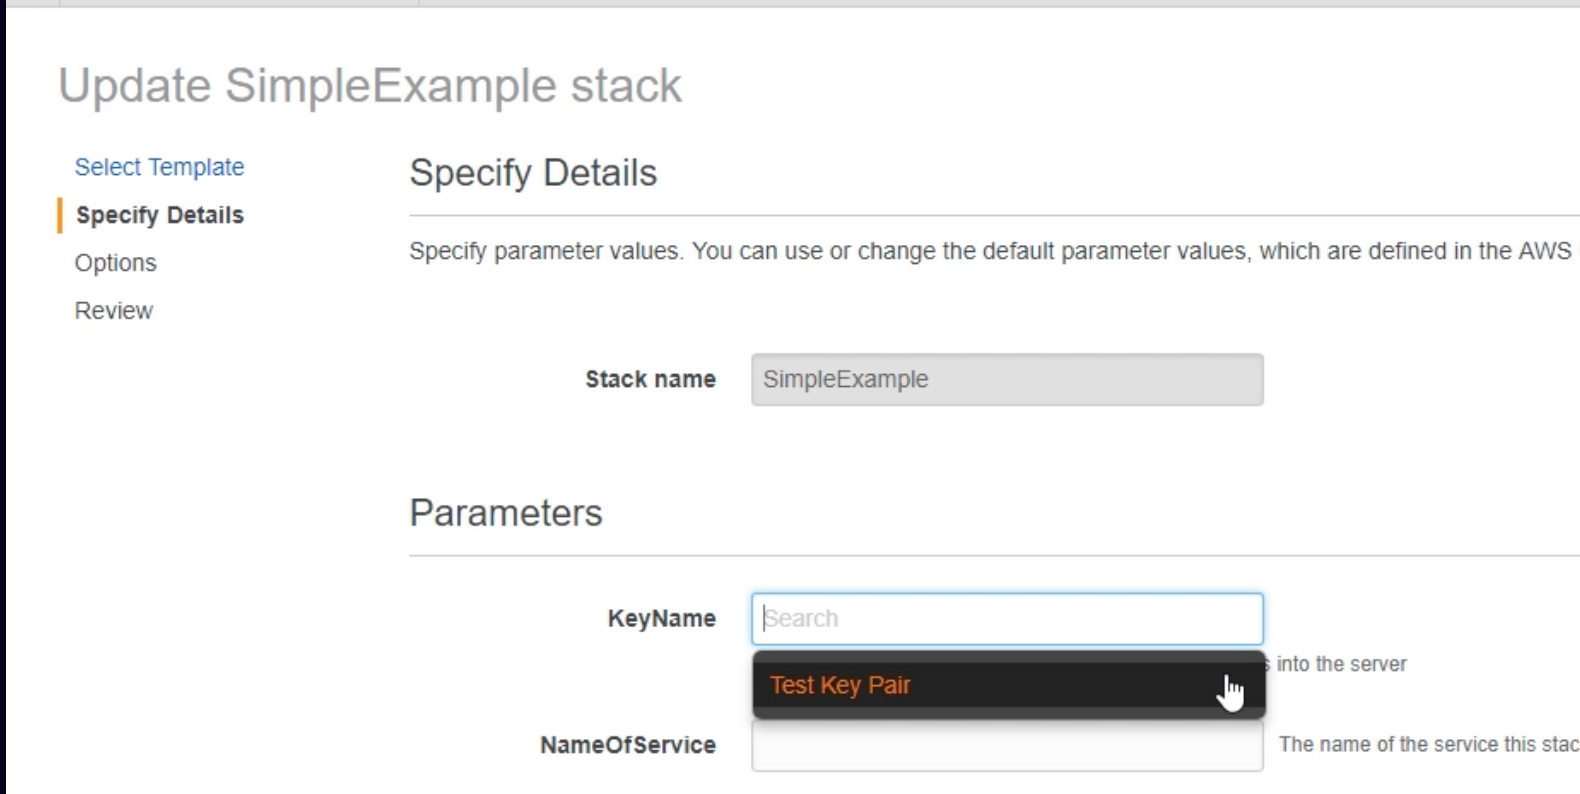 |
| CloudFormation 으로 와서 위 yaml template 으로 update 를 시도하면, 기존에 없었던 KeyName 선택 창이 나타난다. |
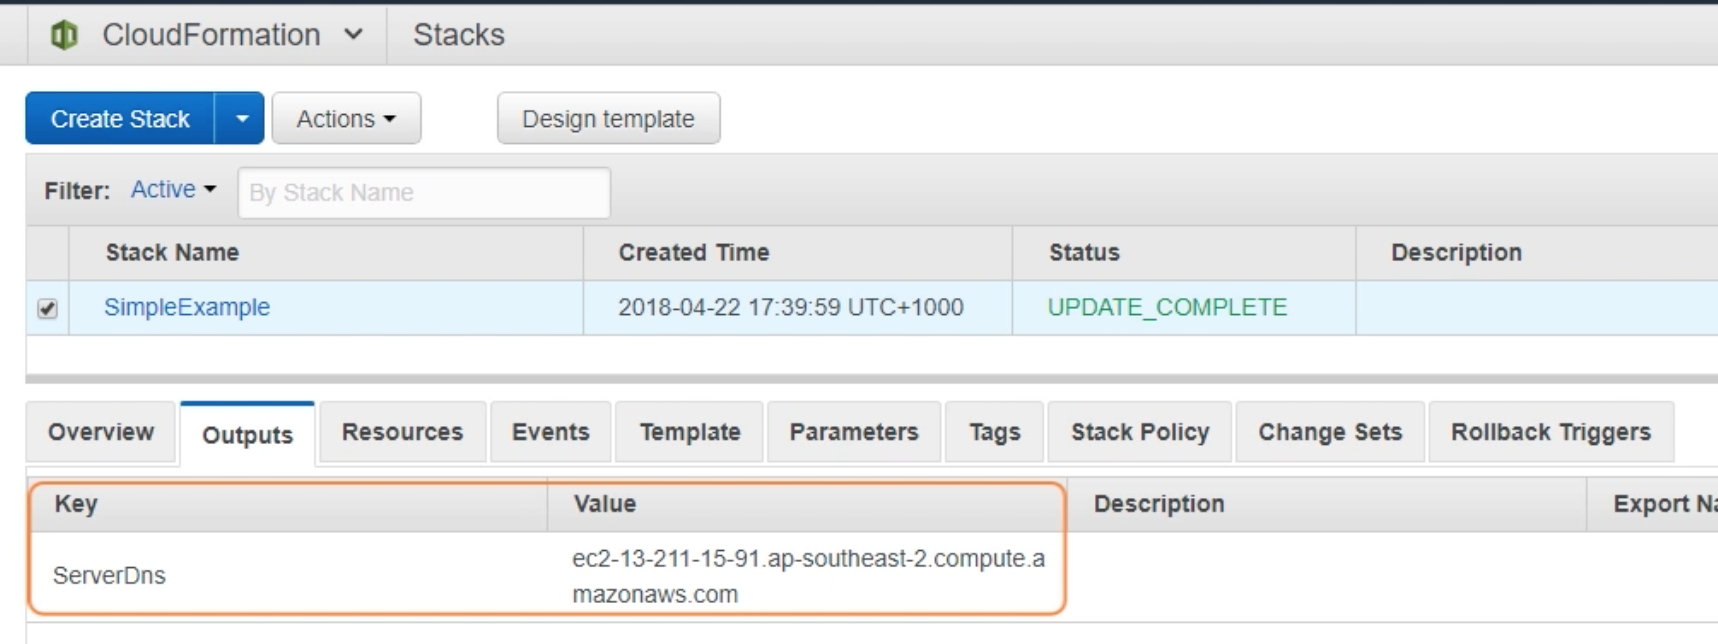
Outputs
Outputs 는 stack 에 있는 자원의 정보에 접근할 수 있게 해준다.
예를 들어, output 을 사용해 EC2 instance 가 생성될 때 PublicIP or DNA 를 반환하도록 할 수 있다.
Outputs 역시 Input 과 마찬가지로 template top level 에 정의한다.

예시:
// json
"Outputs": {
    "InstanceDns": {
        "Description": "The Instance Dns",
        "Value": {
            "Fn::GetAtt": [
                "EC2Instance",
                "PublicDnsName"
            ]
        }
    }
}
# yaml
Outputs:
  ServerDns:
    Value: !GetAtt
      - Ec2Instance
      - PublicDnsName
위의 예시에 정의된 InstanceDns, ServerDns 등은 dynamic 하기 때문에 생성되기 전에는 알 수 없다.
따라서 위와 같이 Outputs 에 정의하면 생성될 때 해당 변수에 저장되어 사용할 수 있게 된다.
위 yaml template 을 사용해 cloudFormation 에서 update 를 하면, 아래와 같이 Outputs 탭에서 새로운 key 와 value 가 만들어진 것을 확인할 수 있다.
 |
예시: EC2 instance setting up
EC2 설치를 위해 필요한 요소들:
- Starting services
- Configuration
- Creating users / groups
- Downloading and installing your application
- Downloading and installing dependencies / packages
아래는 다음 세 가지를 이용해 EC2 instance 를 만드는 예시를 보여줌.
- UserData
- helper script
- Init metadata
UserData
AWS::EC2::Instance 타입의 자원은 UserData 라는 property 를 가지고 있다.
이는 template 의 Properties section 에 나타난다.
UserData 는 Base64 encoded 되어있으며, Linux 와 Windows 에서 약간 다르지만 둘 다 적용된다.
First boot cycle 에서만 실행된다.
UserData for Windows:
- Run as local administrator
- Can be Batch Commands and / or Powershell
- Executed by EC2Config or EC@Launch (Output logs vary)
echo Current date and time >> %SystemRoot%\Temp\test.log
echo %DATE% %TIME% >> %SystemRoot%\Temp\test.log
UserData for Linux:
- Run as root (no need for sudo)
- Not run interactively (no user feedback)
- Logs output to /var/log/cloud-init-output.log
- Start with #! and the interpreter
#!/bin/bash
yum update -y
yum install -y httpd
service httpd start
위 내용을 yaml template 에 담으면 아래와 같이 쓸 수 있다.
# yaml
Resources:
    EC2Instance:
        Type: AWS::EC2::Instance
        Properties:
            UserData:
                !Base64 |
                    #!/bin/bash -xe
                    yum update -y
                    yum install httpd -y
                    service httpd start
Helper script
Procedural scripting (절차지향) 코딩은 쉽게 더러워지기 때문에 ideal 하지 않다.
이를 최적화하기 위해 CloudFormation 은 파이썬 기반의 “helper scripts” 를 제공한다.
이는 Amazon Linux 에 이미 설치되어서 온다.
또한 이 스크립트들은 자동으로 실행되지 않기 때문에 template 에서 호출해야 한다.
Helper script 는 주기적으로 업데이트되며, 다음 명령어로 업데이트할 수 있다.
yum install -y aws-cfn-bootstrap
CloudFormation 에서 제공하는 Helper scripts 는 다음 네 가지가 있다.
cfn-init: Reads and interprets Metadata to execute AWS::CLoudFormation::Init
cfn-signal: Used to signal when resource ro application is ready
cfn-get-metadata: Used to retrieve metadata based on a specific key
cfn-hup: Used to check for updates to metadata and execute custom hooks
CloudFormation Init: cfn-init
cfn-init helper script 는 AWS::CloudFormation::Init 을 사용할 수 있게 해준다:
# yaml
Resources:
    MyInstance:
        Type: "AWS::EC2::Instance"
        Metadata:
            AWS::CloudFormation::Init:
                config: # 다양한 config key 를 가질 수 있음.
                    packages:
                    groups:
                    users:
                    sources:
                    files:
                    commands:
                    services:
        Properties:
여기서 config key 가 하나일 때는 “config” 라고 하고, 여러개인 경우 “Configsets” 를 사용한다.
Configsets 는 config key 목록을 가지고 있으며, 원하는 실행 순서대로 나열되어 있다.
installweb:
    packages:
        yum:
            httpd: []
    services:
        sysvinit:
            httpd:
                enabled: true
                ensureRunning: true
...
installphp:
    packages:
        yum:
            php: []

...
AWS::CloudFormation::Init:
    configSets:
        webphp:
            - "installphp"
            - "installweb"
위의 예시에서, httpd package 를 먼저 설치하고 httpd 에 활성화되고 실행될 수 있도록 요청한다.
한편 php 를 설치하고 yum repository 가 이를 설치하도록 해야한다.
이 경우 configSets 를 사용하면 이 config key 들을 어떤 순서로 실행할지 알려줄 수 있다.
helper script 의 config key 설명:
packages: Downlaod and install pre-packaged applications and components
groups: Create linux/UNIX groups and to assign group IDs
users: Create Linux/UNIX users on the EC2 instance
sources: Download an archive file and unpack it in a target directory on the EC2
files: Create files on the EC2 instance
commands: Execute commands on the EC2 instance
services: Define which services should be enabled or disabled when the instance is launched
Change Sets
기존에 존재하는 stack 을 갱신 (update) 하는 작업은 위험할 수 있다.
이 변화들이 자원에 어떤 영향을 줄지 알 수 있어야 한다.
Change Sets 는 이를 가능하게 해준다.
아래는 SQS Queue 의 이름을 바꿀 때 생길 수 있는 일이다.
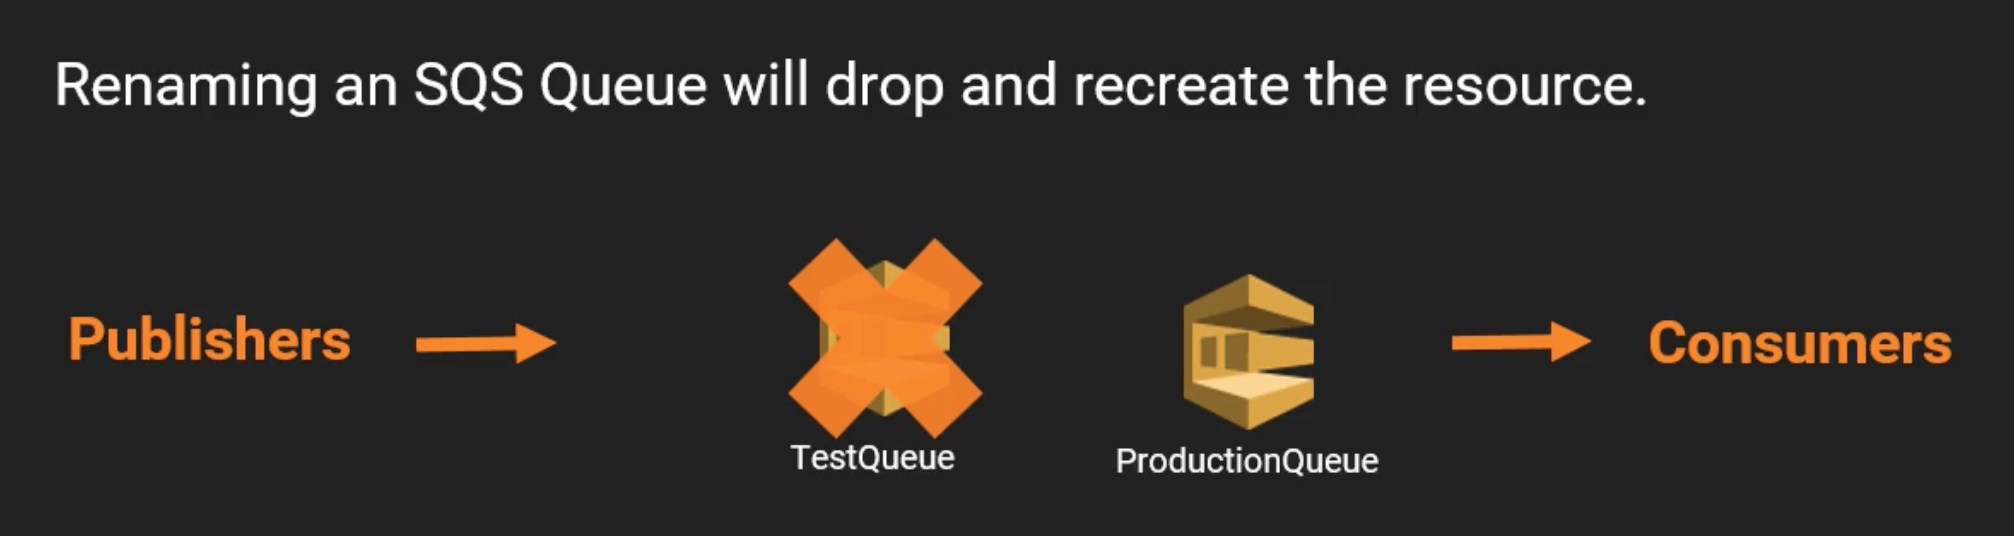 |
|---|
| SQS Queue 의 이름을 바꾸는 경우, Publisher 와 Consumer 가 어떤 queue 를 사용해야 할지 알고 있을까? |
Change Set 의 4 가지 operations:
Create: 기존에 존재하는 stack 에 대해 수정된 template 을 제시해 change set 을 생성. 기존의 stack 을 수정하지 않는다.
View: 생성 후, 제시된 changes 들을 확인할 수 있다.
Execute: Change Set 를 실행하면, 기존에 존재하는 stack 에 해당 change 를 적용한다.
Delete: 해당 changes 를 실행하지 않고 Change Set 을 삭제한다.
Change Set 에서 사용 가능한 data
Change Set 은 “Array of Resource change data types” 이다.
아래는 resource change data type 를 구성하는 요소들을 나열하였다.
Action: action taken on the resource (Add | Modify | Remove)
LogicalResourceId & PhysicalResourceId: Resource’s logcial ID (EC2Instance) and physical ID (i-0a29e20fd8a1b308b)
ResourceType: The type of CloudFormation resource (AWS::EC2::Instance)
Replacement: For modify action, will CloudFormation delete the old resource and create a new one
Scope: Which resource attribute is triggering the update
Details: Description of the chagne ot the resource
아래는 EC2 Instance 에 tag 를 추가했을 때의 Change Set 의 예시이다.
// json
"resourceChange": {
    "resourceType": "AWS::EC2::Instance",
    "logicalResourceId": "EC2Instance",
    "physicalResourceId": "i-0a29e20fd8a1b308b",
    "action": "Modify",
    "replacement": "False",
    "detials": [
        {
            "target": {
                "name": null,
                "requiresRecreation": "Never",
                "attribute": "Tags",
            },
            "causingEntity": null,
            "evaluation": "Static",
            "changeSource": "DirectModification"
        }
    ],
    "scope": ["Tags"]
}
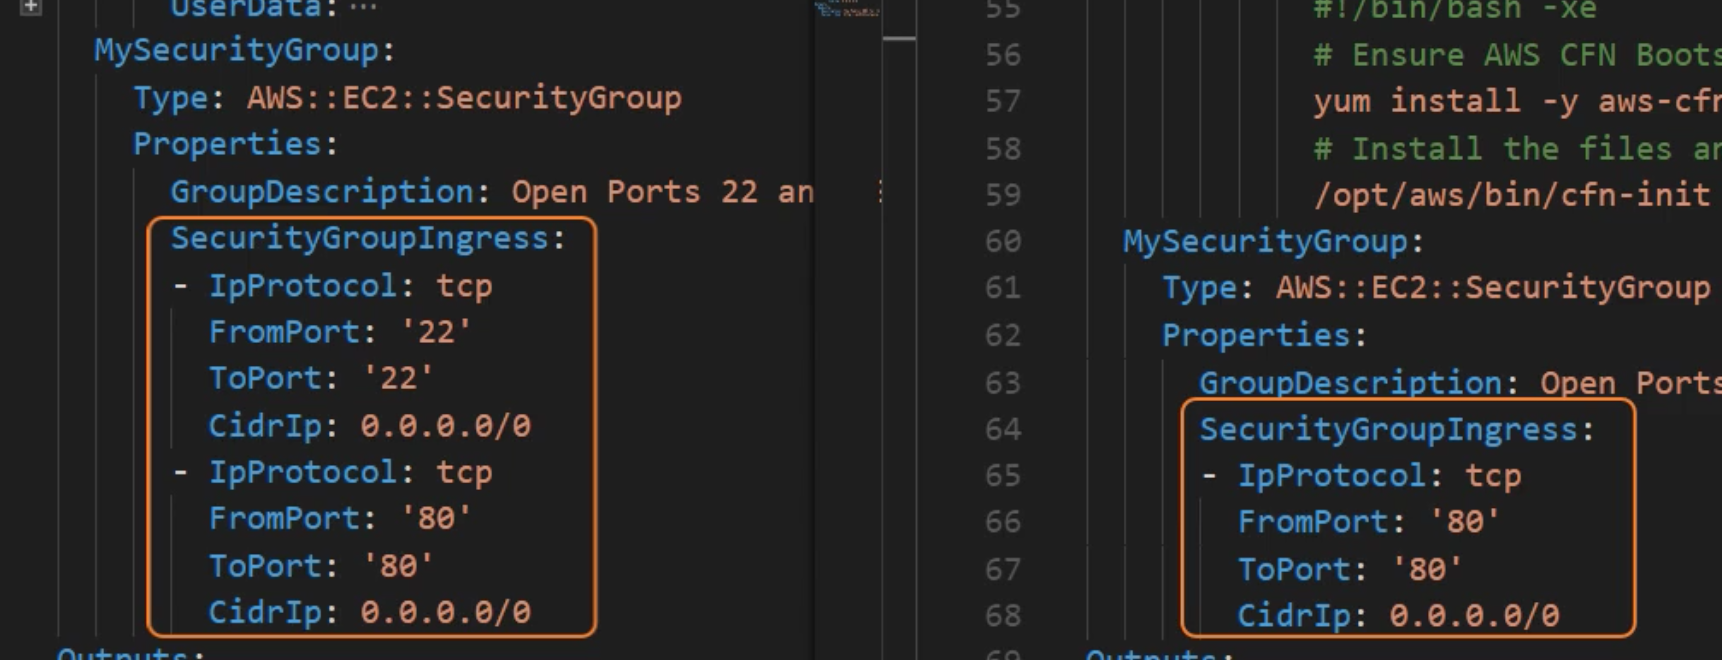
Change Set 을 실제로 사용하는 에시:
 |
|---|
| SecurityGroup 을 왼쪽 template 내용에서 오른쪽 template 내용으로 바꾸고자 한다. |
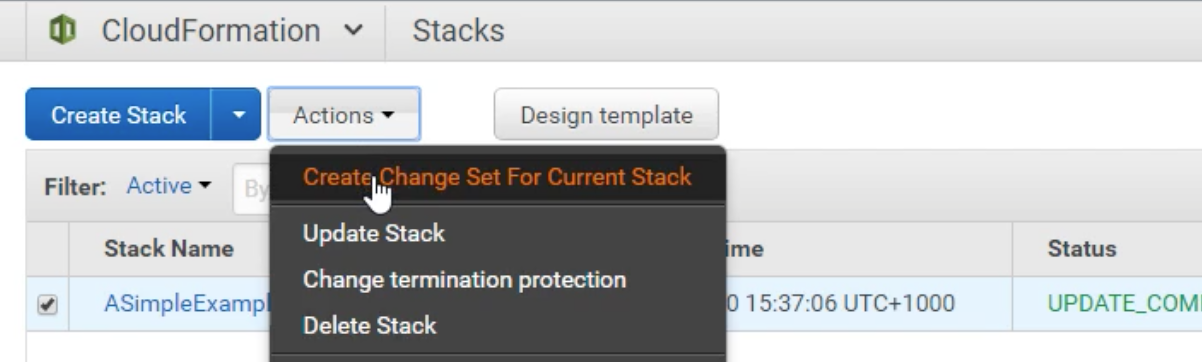 |
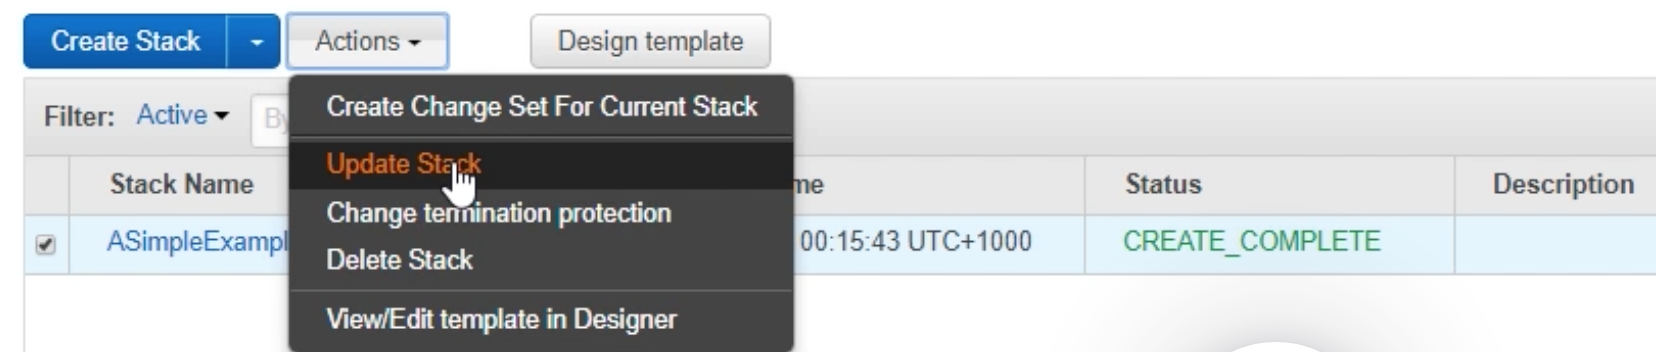
| CloudFormation 에서 stack 선택 후 Create Change Set 을 선택한다. |
 |
| 바꾸고자 하는 template 을 업로드 하고 next 를 누른다. |
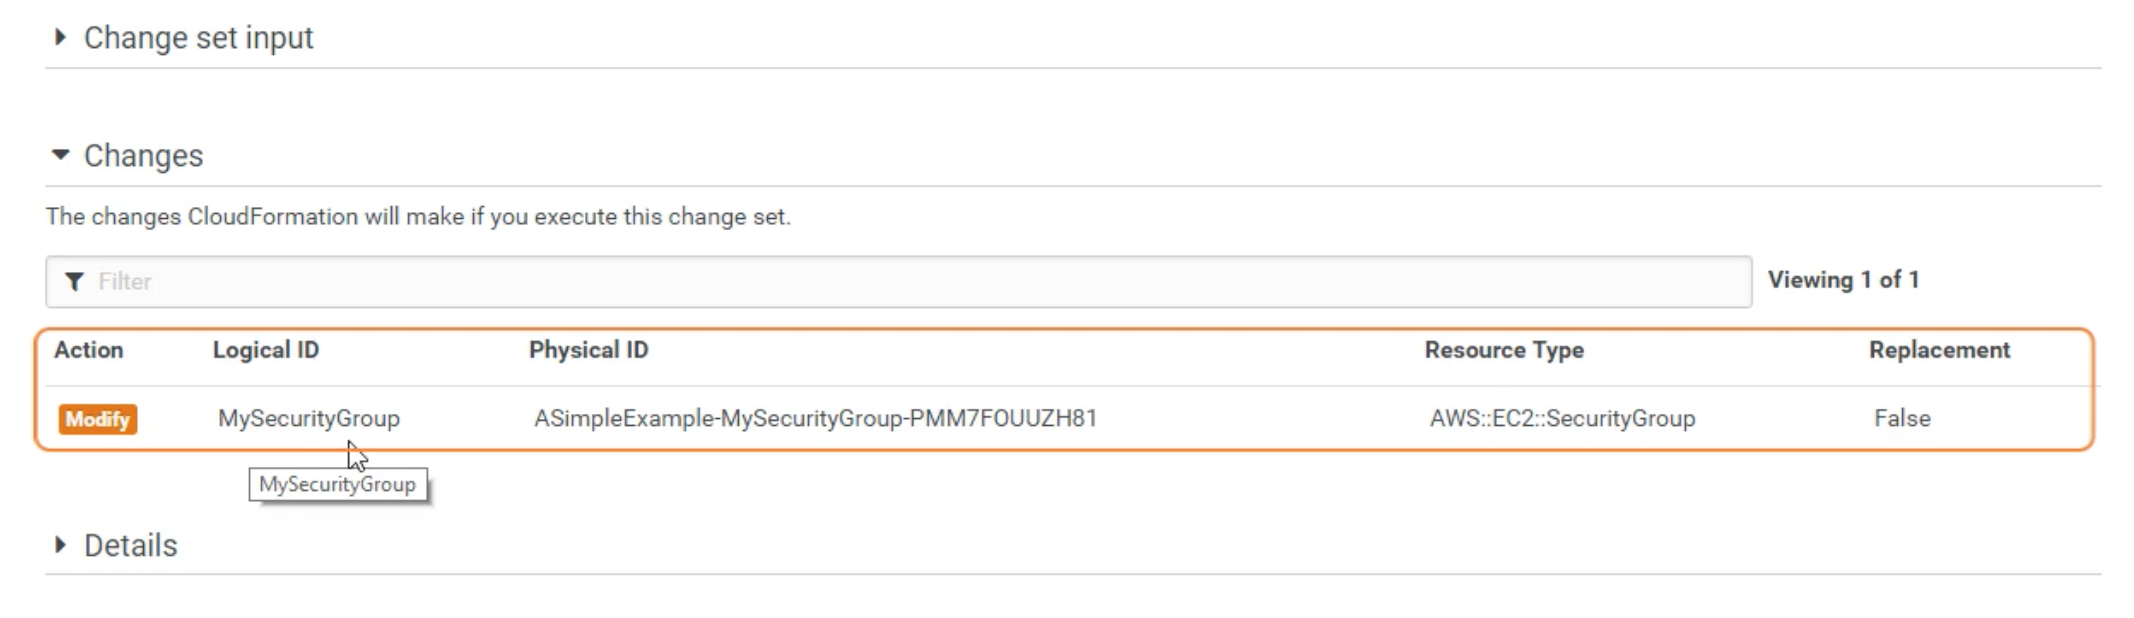 |
| Changes 에는 어떤 내용이 바뀌게 될 것인지 나타난다. |
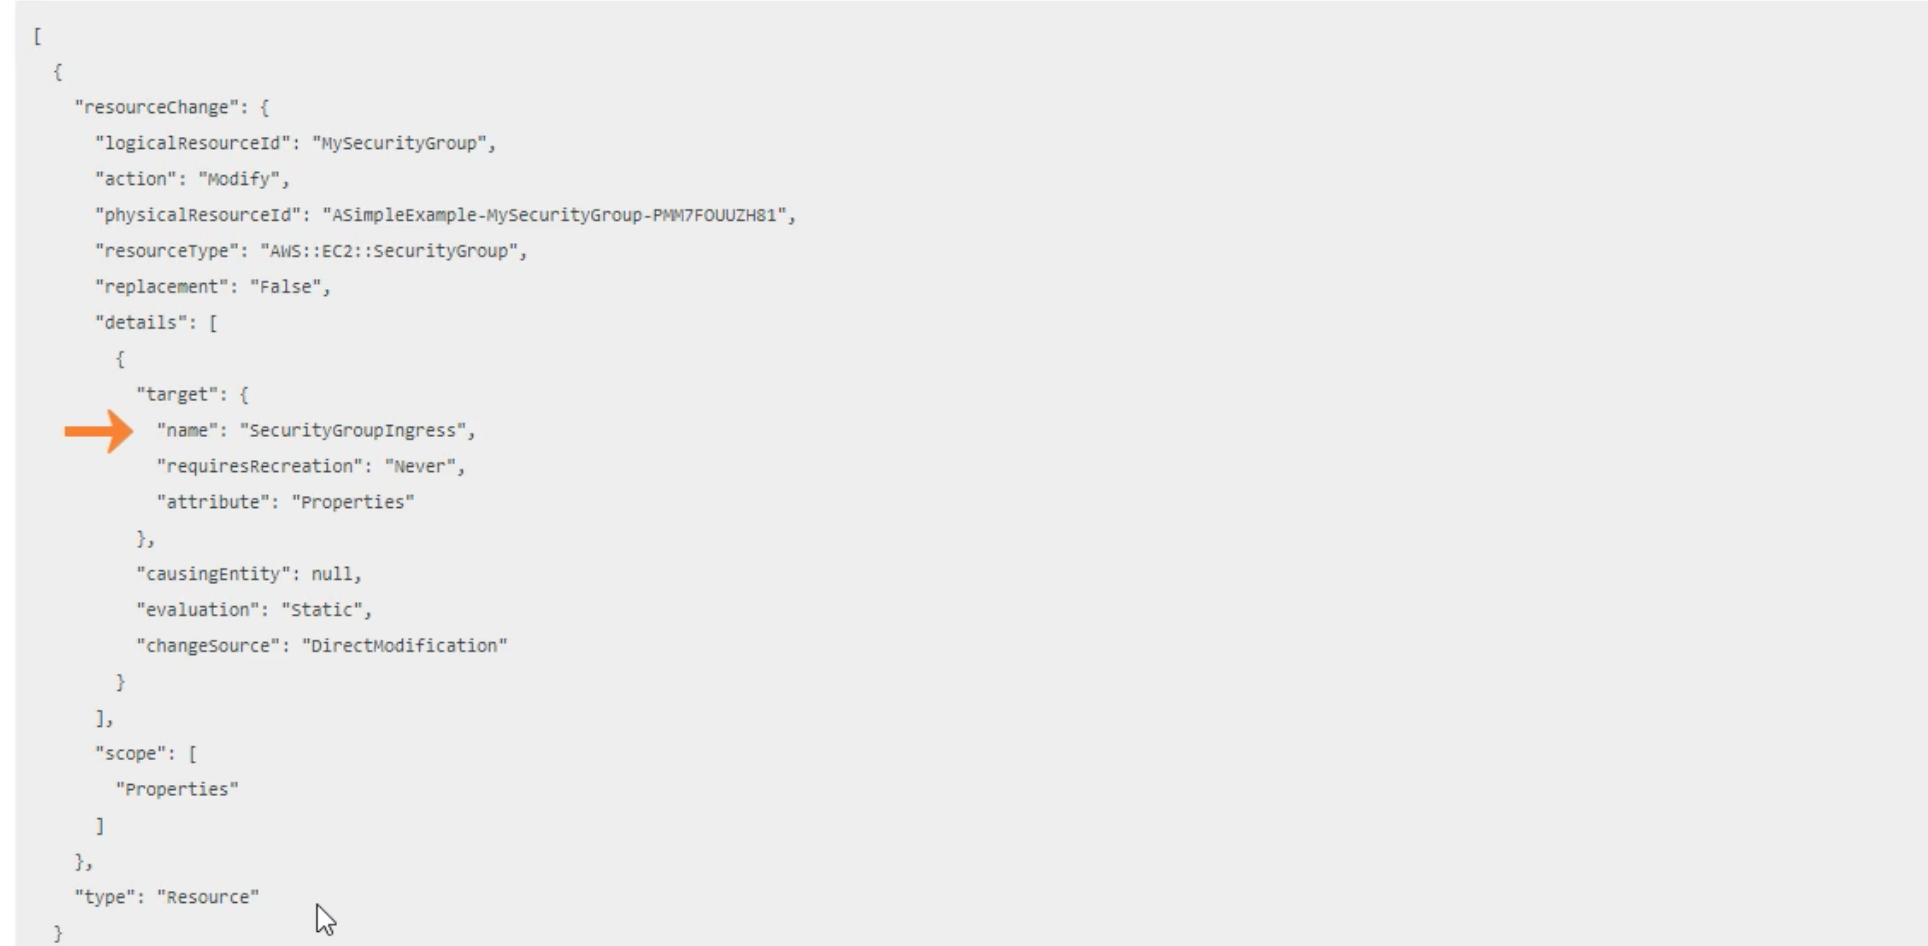 |
| Details 를 누르면 “Array of Resource change data types” 형태로 상세한 변화 내역이 나오게 된다. |
 |
| 변경 내역을 확인한 뒤, 위쪽에서 Change Set 을 새로 만들거나, 현재 Change Set 을 삭제하거나, 이 변경 내역을 적용하도록 Execute 할 수 있다. |
오늘은 AWS CloudFormation 을 공부한 내용을 정리해봤습니다.
그럼 다음 시간에 만나요!